Making a Connected LED
Table of contents
Now let’s transform our basic LED circuit into an online connected internet appliance - a light you can switch on and off from anywhere
Create your Circuit
The circuit, wiring and components are identical to the last time.
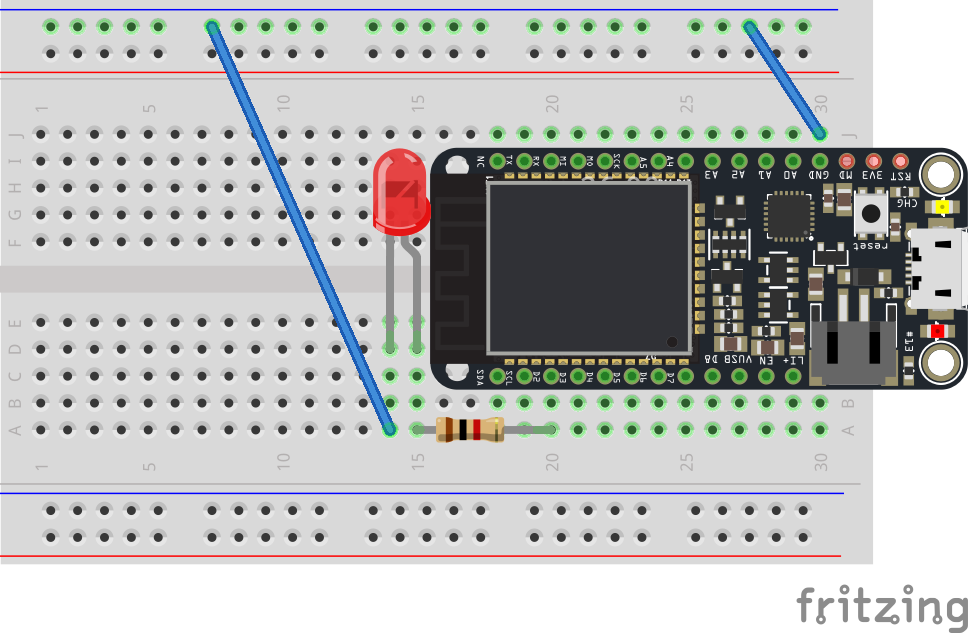
Circuit Diagram for our LE
Setting up the Sketch
Let’s get the basics of our sketch underway.
Add your variables
We’re going to use D2 again, so set up a variable that maps to that pin at the top of your sketch
// name the pins
int ledPin = D2;
Setup setup()
Now, let’s specific the basics of our sketch. We need to configure pin D2 as output, but we also want to set up a starting state to make sure that the light is initially turned off.
void setup()
{
   // Configure the pins to be outputs
   pinMode(ledPin, OUTPUT);

   // Initialize both the LEDs to be OFF
   digitalWrite(ledPin, LOW);
}
What happened to loop()
In this case, all of the heavy lifting is going to be handled by an internet connected function. We don’t need the Particle Photon to do anything during the loop so we leave this totally blank.
void loop()
{
   // Nothing to do here
}
The Main Method
While there’s nothing in loop we do need to have some functionality to control a light.
Our function is called ledControl. It returns an integer and it takes one parameter called command
int ledControl(String command)
{
   int state = LOW;

   // find out the state of the led
   if(command == "HIGH"){
	   state = HIGH;
   }else if(command == "LOW"){
	   state = LOW;
   }else{
	   return -1;
   }

   // write to the appropriate pin
   digitalWrite(ledPin, state);
   return 1;
}
Let’s walk through what is happening here. The function starts with a string (some text) being passed to it from the internet or elsewhere in the code.
We’re going to use this string to make some decisions as to what we should do. Based on what is sent in the string we will either turn the LED on or turn it off.
While we’re making decisions we need a place to store that decision. That’s why an integer variable called ‘state’ is declared. Its initialized (or set) to LOW.
Now we need to make some decisions. For this we use an if...else if...else statement. This uses ‘conditional logic’ to make a series of logical choices based on the information provided.
You see that the if part has some information inside the parentheses i.e. (...). This is called the condition. This basically checks if the condition comes out to be true or false. If the condition is true, everything inside its curly braces is executed, otherwise it skips to the next point.
In other words it makes evaluations based on logic. In this case we are testing equality: if the string passed is the same as the string on the other side of the == signs.The ‘==’ denotes an equality test.
This if...else if...else statement says:
-
If a string with the value of ‘
HIGH’ is passed, set the state variable to ON/HIGH -
If a string with the value of ‘
LOW’ is passed, set the state variable to OFF/LOW -
If some other string is passed, we want to ignore it. We use the return statement to exit the function. We also know the function must provide an integer response so here we send back -1 to indicate something went wrong.
Finally, if a value of ‘HIGH’ or ‘LOW’ was received we’ll want to act on it. We use the digitalWrite function to turn the pin on or off depending what was received. After that we return an integer value of 1 to indicate everything was successful.
Conditions
There are several different types of condition which can be checked. We covered equality (==), but there is also inequality (!=) which checks if two item don’t match. For numbers we can also see if there are more (>) or less (<) than another value, as well as more than or equal to (>=) and less than or equal to (<=)
Read more at: http://arduino.cc/en/Tutorial/IfStatement and http://arduino.cc/en/Reference/if
Conditions
If your conditions only execute one line of code you can simplify your statements and remove the curly brackets surrounding them e.g. if(command == "HIGH") state = HIGH;. But it’s generally good practice to include them!
Finally, add the cloud function
The last thing we need to do is connect the Particle cloud to the function we have just written. We do this by adding a single line to the setup() function.
void setup()
{
   //Register our Particle function here
   Particle.function("led", ledControl);

...
Adding this one line makes the function ledControl available as “led” on the Particle cloud.
Compiling and sending to the Particle Photon.
Make sure the Status Bar has a Particle Photon connected and the Particle Photon’s indicator is breathing blue. If not make sure your Photon is connected by USB and is getting a WiFi signal.
Press the Lightning bolt on the top left of the window.
You’ll see a message ‘Compiling in the Cloud’ and a few sections later your Photon should start flashing magenta.
Wait a few moments, it should return to breathing blue, and the LED should be off.
Controlling your Light.
There’s two ways to control your light. The easy way is through Particle Console, and then you can make a RESTful API call. We’ll do both.
Using Particle Console.
Open a new tab in your browser and visit http://console.particle.io. This is the console. It allows you to explore your devices and see what they’re up to.
From the devices list, choose your Photon by clicking on it. You’ll see a screen like this
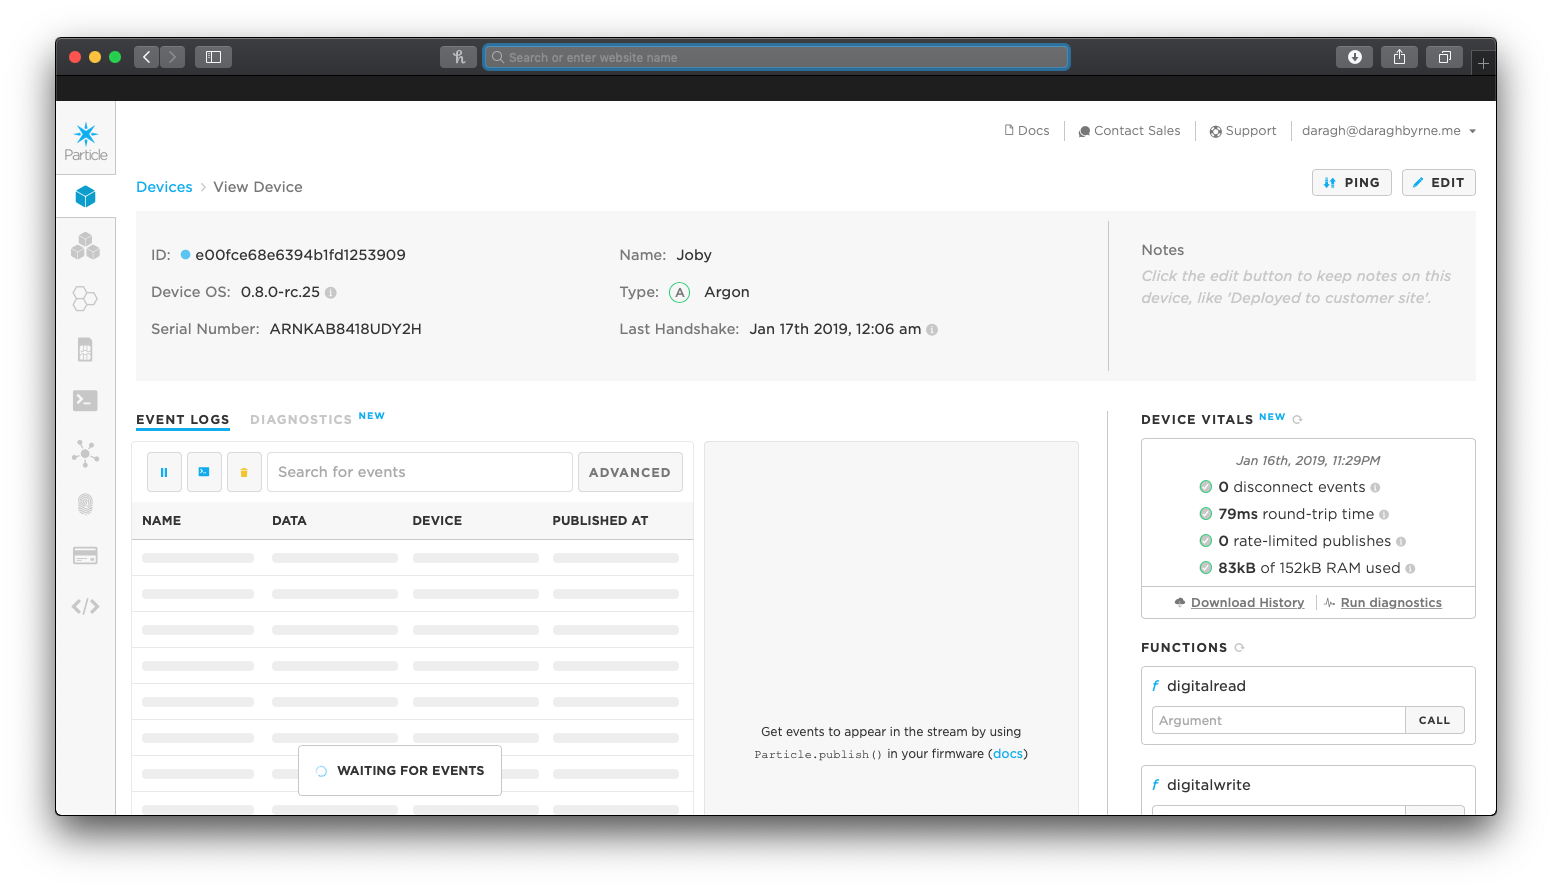
On the right hand side you’ll be able to access Cloud Functions. You should see a text box below a function named led. Just type HIGH or LOW into the box. It’ll show a spinning indicator for a second and then your light should respond as expected.
Using the REST API
-
Open up http://particle.io/build
-
Select the Target Icon to view your Particle devices. Select the device which is currently connected and the device ID information will appear.
-
Copy down the device ID - you’ll need that in a second.
-
You also need an Access Token. To get that click on the ‘Settings’ icon. You’ll see an access token string. Copy this down too.
-
Modify the below and paste it into a Terminal Window
curl https://api.particle.io/v1/devices/[deviceID]/led -d access_token=[access_token] -d params=HIGH
You will get a response like
{
  "id": "3432094809234802938498230948239",
  "name": "ParticleBoardName",
  "last_app": null,
  "connected": true,
  "return_value": 1
Congratulations! You just put your LED on the internet!
Build your skills - Independent Exercises
Exercise 1
Modify the cloud function to blink the LED 3 times after it is called
Exercise 2
Modify the cloud function as follows:
Instead of passing a HIGH Or LOW string pass the number of times you would like it to blink
Set the function to blink that number of times
Finally once it has completed all of the blinking it should turn the LED off
Exercise 3
Go back to the original program. Now add a second LED to the circuit.
Change the program and cloud function to allow you to control both LEDs remotely