Practice Exercise: DIY A Sensor
Table of contents
This practice exercise will ask you to get familiar with the sensors in your kits. It will ask you to
- learn how to integrate sensing into your circuits and read information from the environment around you;
- become familiar with how to write code to translate sensors into outputs (in this case, cloud connectivity and an LED)
- explore a component that helps you make in-roads into your first creative project.
Brief
-
Start by reviewing the introductory materials for the sensor section, e.g. what are sensors, reading from sensors, etc.
-
Try DIY’ing a soil moisture sensor to practice soldering, wire stripping and other essential skills for electronics.
Practice Hand skills
In this section, we’ll walk you through DIY’ing a soil moisture sensor. This is an excellent way to practice some of your hands skills: wirestripping, soldering, and working with heat shrink.
What is a soil moisture sensor?
A soil moisture sensor is a simple sensor that gives you a measure of how much water in soil and it’s an incredibly simple sensor. Water is a conductor of electricity (it let’s it flow.) This means that if there’s more water in the soil, electricity has more ability to flow. As it dries out, there’s less conductivity and more resistance. And we can measure this.
So, if we put two electrodes in the soil. We connect one to to power and the other to a pin on our Particle. We can use this approach to roughly measure the amount of water in the soil.
You will need:
Sensor and circuit
- Jumper Wires
- A 10kΩ Resistor
- 2 x Galvanized Nails or other metal ‘probe’
- Packing foam
- Heat shrink
Tools
- Scissors
- Wirestrippers
- A soldering iron
- Heat gun
Build your sensor

Image Credit: GardenBot.
-
Start by cutting a small square of packing foam. This should be at least 1 inch deep by 2 inches wide. We’ll place the soil probes into this to hold them in place. Make sure the packing foam is plyable enough to accept the sensors (i.e. nails) being pushed through.
-
Using a pen and a ruler, mark two points for your nails to be placed in the foam. Do this top and bottom so the soil probes line up and are even. They should be positioned about 1” to 1.5” apart.
-
Punch a hole using the nails. Remove the nails.

Image Credit: GardenBot.
- Solder one jumper wire to the top of each nail. If you are working with a spool of wire, make sure you give yourself ample lenght to work with.

Image Credit: GardenBot.
-
If you want to insulate your nail, this is where the heat shrink comes in. Place the heat shrink over the soldered joint, and cover the nail so only the last 30-50mm are exposed. Apply heat and shrink the tubing to have a tight fit.
-
Push the nails / sensors into the foam block.
Assemble your circuit
Connect your assembled soil probe as follows:
- Connect one terminal to `3v3
- Connect the other terminal to the breadboard
- Add a pull-down resistor that returns to
GND - Connect the soil terminal to an analog pin e.g.
A5
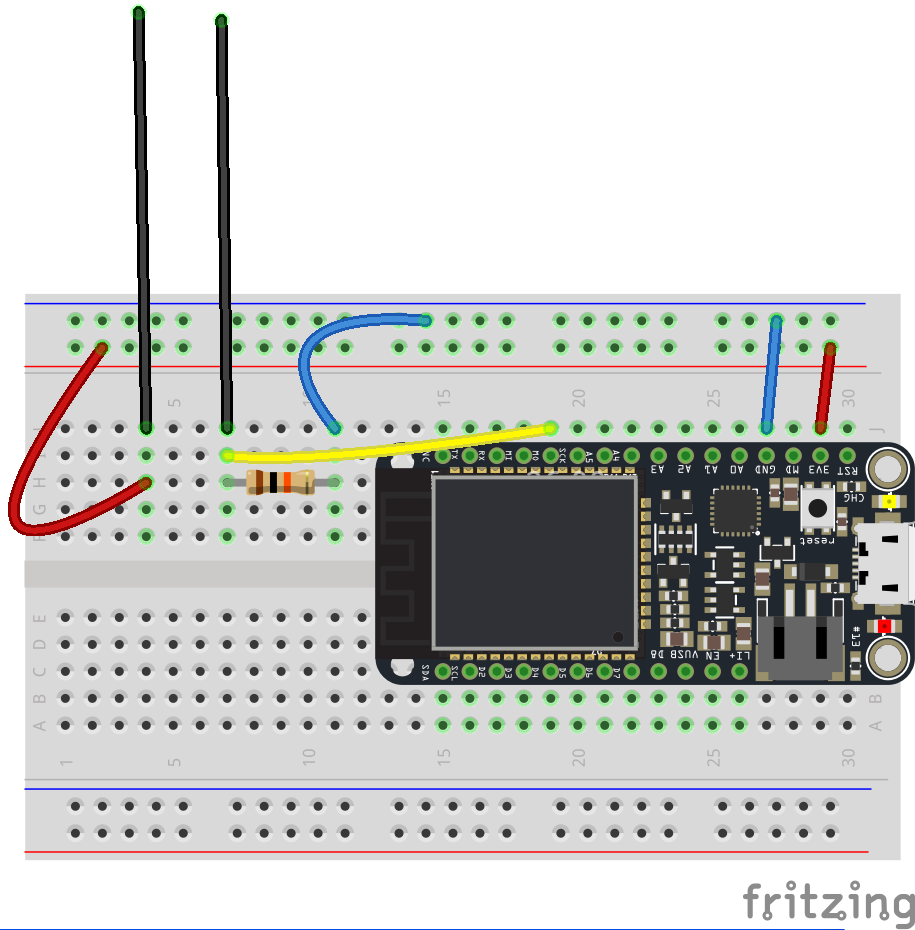
Fritzing Circuit Diagram
Use this code:
int moistPin = A5;
int moistVal = 0;

void setup()
{
  Serial.begin(9600);
	Particle.variable( "soil", moistVal );
}
void loop()
{
  moistVal = analogRead(moistPin);
  Serial.println(moistVal);

  delay(100);
}
Some notes:
-
If you don’t want to build it for yourself, sparkfun make an excellent soil moisture sensor that costs around $6.
-
This type of sensor is prone to rapid corrosion from electrolysis. It’s normally only good for about a month of continuous use. Sampling the sensor less frequently and turning power off between samples will help. Hackaday suggests using graphite probes and gardenbot suggests using a voltage flipping approach
If you’re feeling really ambitious, you might try DIY’ing a soil moisture sensor. This is an excellent way to
Learn More