Tutorial: Using a pushbutton
Table of contents
- Step 1: Identifying your Pushbutton
- Step 2: Create your Circuit
- Step 3: Setting up the Sketch
- Step 4: Compiling and sending to your microcontroller
- Find out more
This tutorial will introduce you to the basics of using a push button to get input for your application. We’ll create a basic application where we turn a light on and off using a pushbutton.
You will need
-
Particle Microcontroller
-
A single color LED (Light Emitting Diode)
-
A mini pushbutton (or any other button)
Step 1: Identifying your Pushbutton
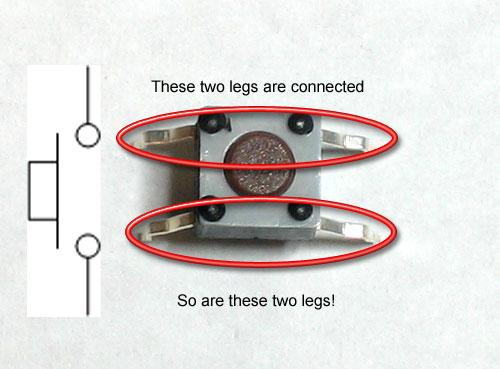
Your pushbutton looks like this. You should have two of them in your kit.

It’s a pretty simple component. It has two legs on either side.
It works like a switch. By pushing down on the button, it creates a connection between the terminals allowing electricity to flow. When you release the electricity can no longer flow.
It does have four legs. The legs on either side are wired together, so its important to keep this in mind when you’re adding it to your circuit.
Step 2: Create your Circuit
The circuit, wiring and components are as follows:

Wiring to ground?
Notice that we’ve wired the pushbutton to ground, and not to power. This is because unlike sensors we can use an internal pullup resistor to get consistent readings from the pushbutton. You can find out more here: http://playground.arduino.cc/CommonTopics/PullUpDownResistor
Step 3: Setting up the Sketch
// We will be using D2 to control our LED
int ledPin = D2;

// Our button wired to D0
int buttonPin = D3;

void setup()
{

  // For input, we define the
  // pushbutton as an input-pullup
  // this uses an internal pullup resistor
  // to manage consistent reads from the device

  pinMode( buttonPin , INPUT_PULLUP); // sets pin as input

  // We also want to use the LED

  pinMode( ledPin , OUTPUT ); // sets pin as output

}

void loop()
{
   // find out if the button is pushed
   // or not by reading from it.
   int buttonState = digitalRead( buttonPin );

  // remember that we have wired the pushbutton to
  // ground and are using a pulldown resistor
  // that means, when the button is pushed,
  // we will get a LOW signal
  // when the button is not pushed we'll get a HIGH

  // let's use that to set our LED on or off

  if( buttonState == LOW )
  {
    // turn the LED On
    digitalWrite( ledPin, HIGH);
  }else{
    // otherwise
    // turn the LED Off
    digitalWrite( ledPin, LOW);

  }


}
Step 4: Compiling and sending to your microcontroller
Compile and push your button!