Claiming your Particle Photon2
Table of contents
- Claiming your Particle Photon2
Claiming your Particle microcontroller is a process where you — as the name suggests — lay claim to a specific microcontroller. Going through these steps, registers and links the Photon2 in your kit to your Particle account. This will allow you to manage, update and push code to the board.
There are three ways to setup and claim your Particle Photon2. These are:
- Using the Particle Setup Tool to walk through step-by-step the process
- Using the Particle Command Line Interface (CLI) to do much the same.
- Using the Particle Build online tool to link an Argon.
We’ll cover them in this guide. You just need to choose one of these approaches i.e. don’t follow all of the steps, pick one option only!
Option 1: Claim with the Particle Setup Tool
Using Chrome?
This process uses a feature of the Chrome Browser that allows a web application to communicate with devices connected on the USB (or Serial) port. If you’re not using Chrome, you’ll need to download it and install it to proceed.
This route is the easiest and strongly recommended!
The quickest and easiest way to claim and set up the WiFi for your device is to use the Particle Online Setup Tool to connect with the Photon2 and give it the WiFi network information.
Working on the CMU Network?
To use the Argon on the CMU network, you will have to pre-registered your Argons with the CMU network. You must complete this step first, before following the guides below. To do this, visit the Claim it with CLI guide and follow the instructions up to and including ‘Get the Mac Address & Register the Device with CMU’ in the document that outlines the claiming process through the CLI
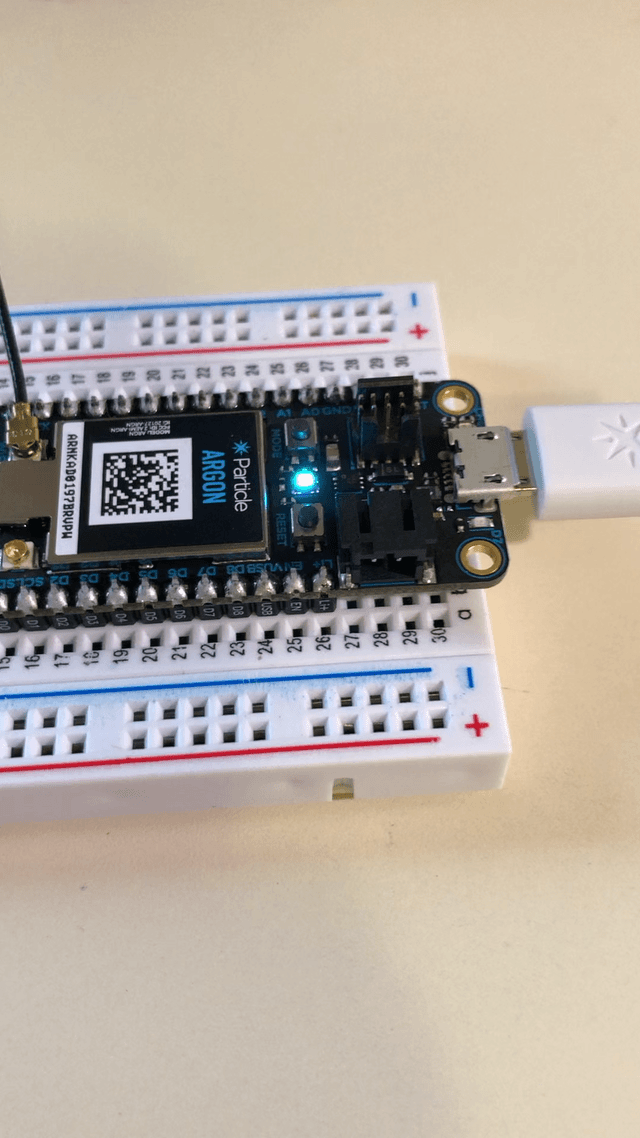
1.1 Put your Photon2 in Listening Mode
Connect your Photon2 by USB to your computer’s port.
If it’s not already, make sure the LED on your device is blinking deep blue. If it’s not, just hold down the MODE button for 3-5 seconds and try the steps again.
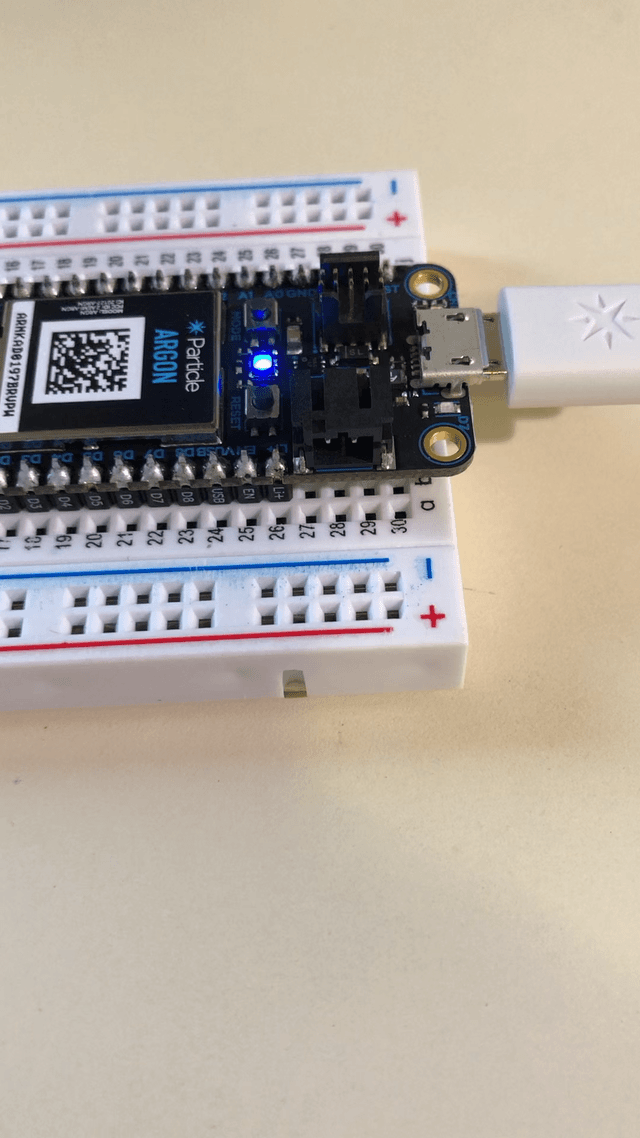
The Argon when in listening mode will blink blue
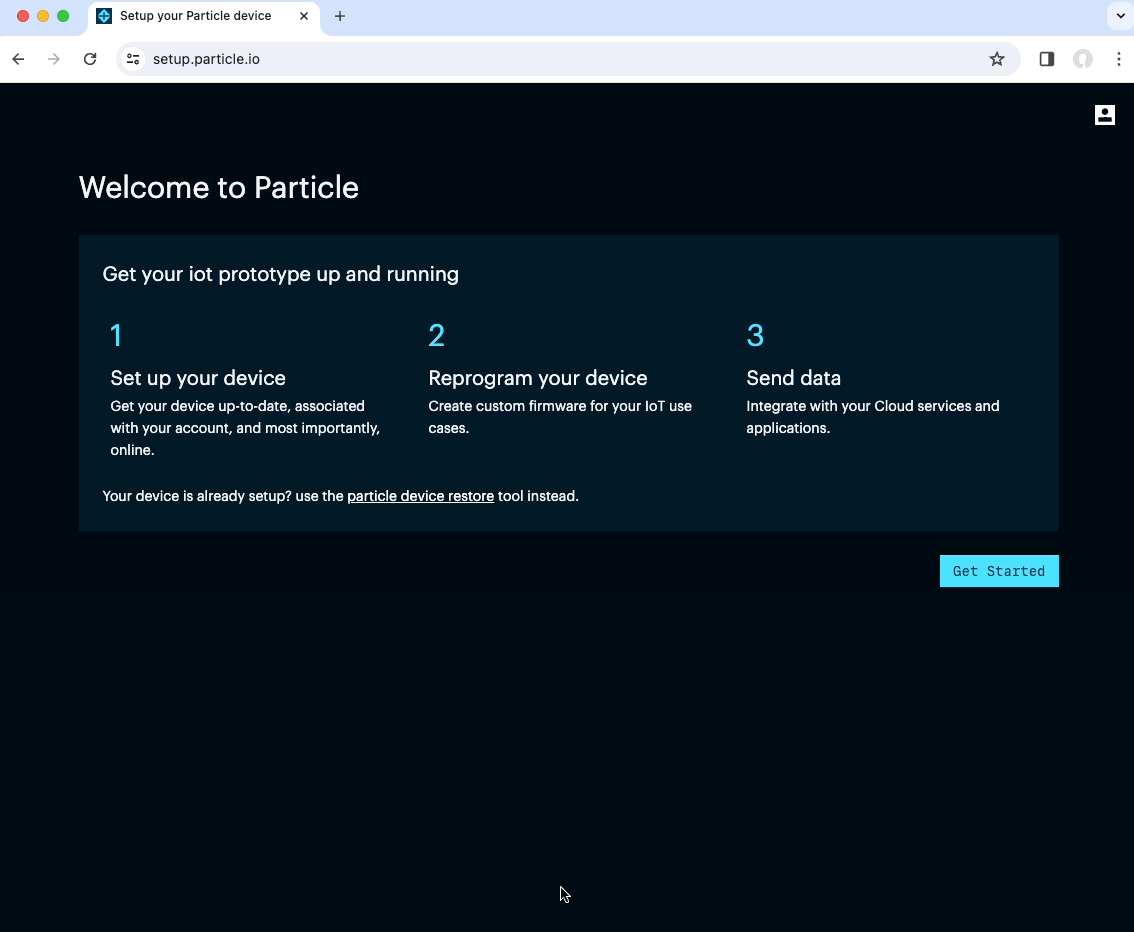
1.2 Visit https://setup.particle.io/
Launch Chrome, and visit Particle Setup . It’ll walk you through the steps.
1.3 Follow the App’s Instructions
Follow the in-app prompts to claim your Argon. These are illustrated below.
After connecting the Photon2 via USB, the setup process will install updated firmware on the Photon2. This process will take a few minutes so be patient!
During this time you will see the Photon2’s status LED initially turn yellow and later blink through sequences of magenta as it installs the update.
During this process, you will:
- Connect your Photon2 (named P2) via USB
- Allow it to go into DFU mode, and then reconnect as ‘P2 DFU mode’
- Wait for the install to complete (1-2 minutes)
- Give your device a memorable name
- Choose
CMU-DEVICEas the WiFi Network - The Photon should reboot and connect to WiFi (breathing blue). Wait until it’s connected
- When your Argon connects to the Particle cloud, it’ll link your account with the device
The app will find nearby WiFi networks and allow you to connect your Photon2 to one. You will need the WiFi network name and password (if one is needed).
Critical
If you are connecting using the CMU network, the only network you can use is CMU-DEVICE. Do not select CMU-SECURE or CMU-Guest
All going well, you should see this message 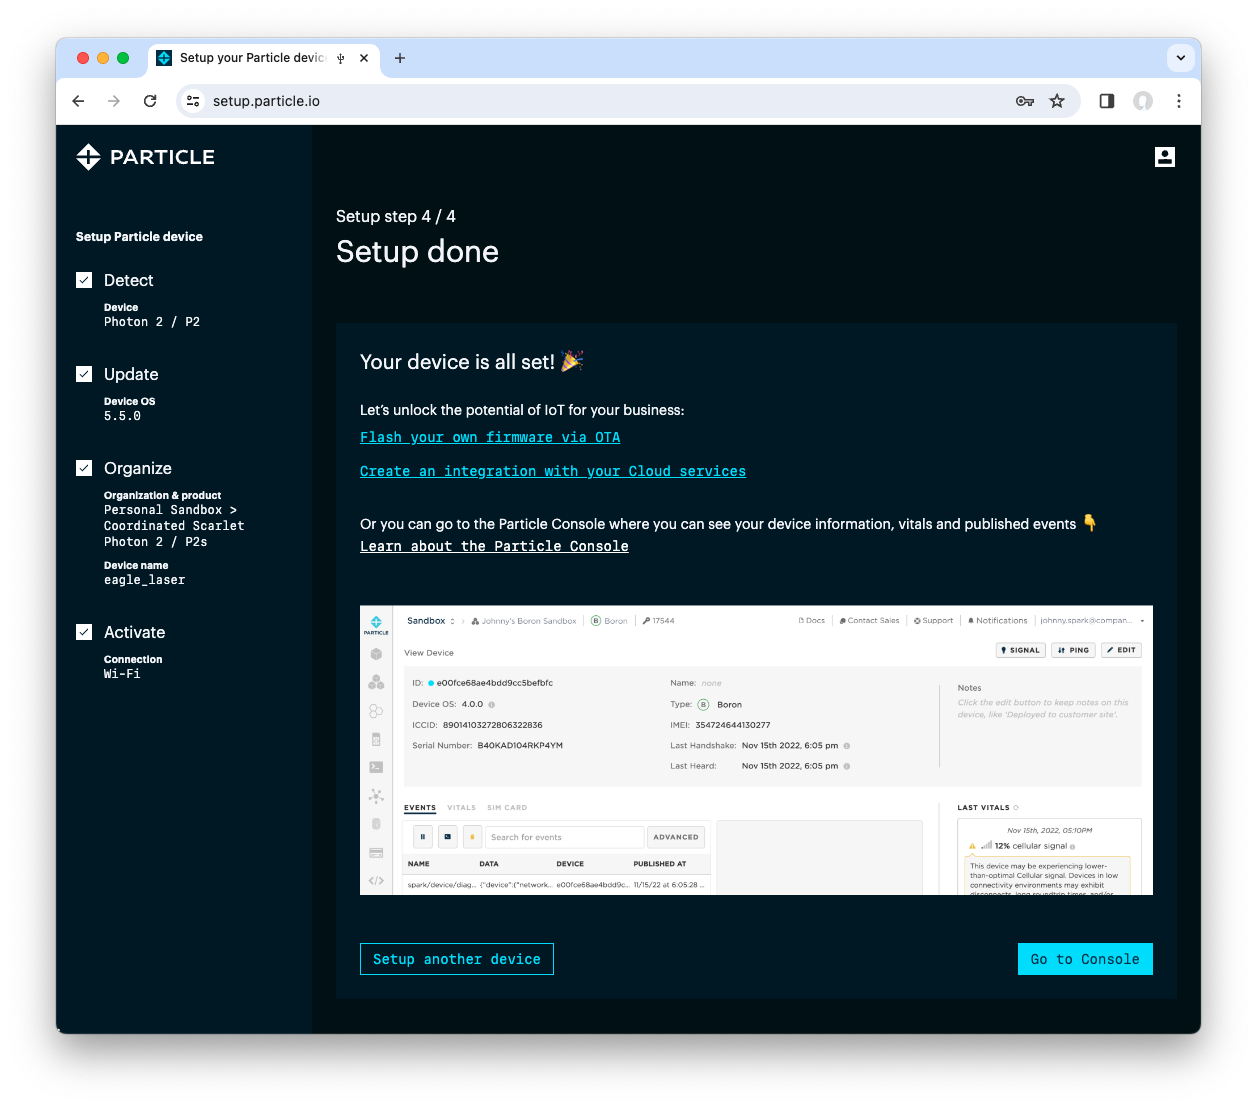
Having Trouble?
To set WiFi credientials your Particle device needs to be in listening mode. To check, just make sure the LED on your device is blinking deep blue.
If its not, just hold down the MODE button for 3-5 seconds and try the steps again.
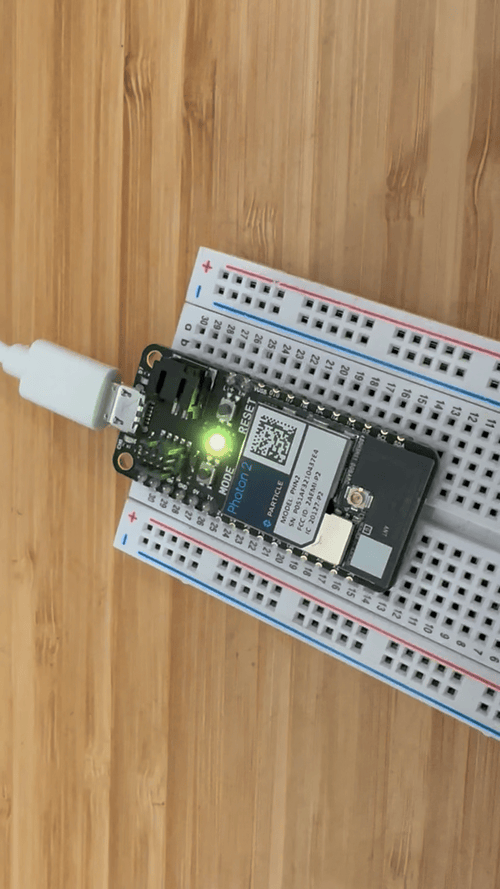
1.5 Connected to the Cloud
When the device setup is complete, you will see the Particle change from blinking blue to breathing cyan. It should now look like this:
The Argon when connected to the device cloud
Now when you power on your Argon, the status indicator will display a sequence of actions:
- Fast Blinking Green: Searching for WiFi
- Blinking Cyan: Connecting to your WiFi network
- Breathing Cyan: Connected to your WiFi network.
This sequence may take up to a minute depending on how close your Argon is to the WiFi signal source (it takes longer if the signal is weak).
Magenta
If you complete this step and your Argon turns magenta, this is nothing to be worried about. Sometimes during startup, the Argon will detect an update to its operating system or firmware. When it is in the process of installing an update, it will display magenta and intermittently blink the status indicator as it completes processes. If after claiming your Argon, it turns magenta, be patient. It may be installing an update and you should avoid interrupting this process i.e. Don’t power it down
Option 2: Claim with the CLI
This step requires you to have setup and installed the CLI. If you haven’t done this yet, jump to this guide: <../2-cli-basics/>
First, make sure your Argon is powered on, and connected by USB to the computer you are using to claim it.
2.1 Put your Argon in Listening Mode
If it’s not already, make sure the LED on your device is blinking deep blue. If it’s not, just hold down the SETUP button for 3-5 seconds and try the steps again.
The Argon when in listening mode will blink blue
2.2 particle setup
Open a command line (on Windows use the Command Line application and on Mac OSX use Terminal) window and type:
particle setup
If the CLI doesn't find your Argon connected via USB?
Double check you have put your device in listening mode. If not try removing other USB devices that connected (e.g. a bluetooth dongle, etc). These dongles can sometimes interfer with the CLI’s ability to find Argon on the USB port. Remove them until the setup process is complete then you can add them back again.
Then, confirm your account by typing Y and follow the prompts provided.
2.3 Enter wireless network information
The app will find nearby WiFi networks and allow you to connect your Argon to one. You will need the WiFi network name and password (if one is needed).
Critical
If you are connecting using the CMU network, the only network you can use is CMU-DEVICE. Do not select CMU-SECURE or CMU-Guest
Once you’ve selected a wireless network, allow the process to auto-detect the wireless security type/
Then:
- The Argon should reboot and connect to WiFi (breathing blue). Wait until it’s connected
- When your Argon connects to the Particle cloud, it’ll link your account with the device
Having Trouble?
To set WiFi credientials your Particle device needs to be in listening mode. To check, just make sure the LED on your device is blinking deep blue.
If its not, just hold down the SETUP button for 3-5 seconds and try the steps again.
2.4 Connecting to the Cloud
When the device setup is complete, you will see the Particle change from blinking blue to breathing cyan. It should now look like this:
The Argon when connected to the device cloud
Now when you power on your Argon, the status indicator will display a sequence of actions:
- Fast Blinking Green: Searching for WiFi
- Blinking Cyan: Connecting to your WiFi network
- Breathing Cyan: Connected to your WiFi network.
This sequence may take up to a minute depending on how close your Argon is to the WiFi signal source (it takes longer if the signal is weak).
Magenta
If you complete this step and your Argon turns magenta, this is nothing to be worried about. Sometimes during startup, the Argon will detect an update to its operating system or firmware. When it is in the process of installing an update, it will display magenta and intermittently blink the status indicator as it completes processes. If after claiming your Argon, it turns magenta, be patient. It may be installing an update and you should avoid interrupting this process i.e. Don’t power it down
2.5 Bonus: Claiming Manually with the CLI
Magenta
If you have completed the setup above and it’s worked, you’re done. Only proceed with 2.5 if claiming through the online setup hasn’t worked
If any of this doesn’t work as planned or as expected you can also manually claim the Particle board through the CLI.
First, you’ll need to provide the WiFi credentials to the device. Simply type particle setup wifi and follow the prompts.
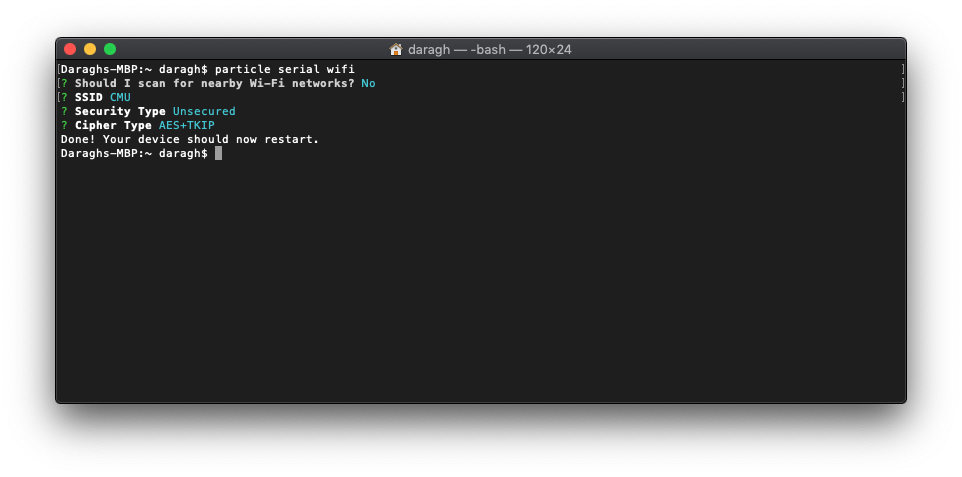
Process for adding WiFi credentials to your Particle device through the CLI
Now… Cross your fingers. In a few seconds, your Particle Argon should flash green then slowly pulse cyan. This means it’s connected to your WiFi network. Super!
Having Trouble?
To set WiFi credientials your Particle device needs to be in listening mode. To check, just make sure the LED on your device is blinking deep blue.
If its not, just hold down the SETUP button for 3-5 seconds and try the steps again.
Wait for your board to be online and connected to the Particle Cloud. If it isn’t yet online, this next step won’t work.
particle device add DEVICE_ID
Where DEVICE_ID should be substituted for the actual device ID.
Finding the Device ID
If you want to find out how to get the Device ID, go back to the CLI introduction section.
If you type particle list you should now see an online Argon in your list of paired devices
To give your device a memorable name, type: particle device rename DEVICE_ID NAME_TO_GIVE_IT where DEVICE_ID should be substituted for the actual device ID and NAME_TO_GIVE_IT should be something memorable and shouldn’t contain spaces.
Option 3: Claim with Particle Build
The Argon has to be connected to WiFi and able to talk to the Particle cloud for the pairing process to work. That means we need to get it onto your home network or the campus network (depending where you are). To do this we’ll now need to share with it the credentials, or connection information.
3.1 Provide WiFi Credentials
If you’ve set up the Particle CLI, simply type particle setup wifi and follow the prompts.
Process for adding WiFi credentials to your Particle device through the CLI
Now… Cross your fingers. In a few seconds, your Particle Argon should flash green then slowly pulse cyan. This means it’s connected to your WiFi network. Super!
Having Trouble?
To set WiFi credientials your Particle device needs to be in listening mode. To check, just make sure the LED on your device is blinking deep blue.
If its not, just hold down the SETUP button for 3-5 seconds and try the steps again.
3.2 Claiming your device
Your Particle’s online and we’re ready to claim your device. Essentially we’re telling the Particle framework that this device belongs to your account and you’re the only person who should be able to access it’s data and send code to it.
To do this we need to know what the device is called in computer speak, or its hexadecimal ID (see CLI introduction section)
Thankfully you’ve already got this. So now you can claim your device using the Device ID through the Build tool online. To do this:
-
Visit: https://build.particle.io/build#devices choose the devices option (bottom left, looks like a cross-hairs)
-
Click the ‘Add a new Device’ button, paste in the device ID, and click to ‘claim device’.
-
Once added you can click on the name of any claimed device to rename it or view the device ID.
3.3 Name your device
Now is a good time to name your device something memorable. Visit the Particle Console — a tool for managing your devices — choose My Devices on the left hand sidebar. Navigate to your devive and click on it. Once loaded, click the edit button.
This will give you the option to rename your device.
All Set
Tah Dah! You’re all set to start using your Argon!
If ever you don’t see this sequence when power on your Argon, you’ve moved locations or it remains in listening mode (blinking blue), you might need to reapply the WiFi Credentials. Just go through the claim process again in the Particle mobile app to do this.
Changing Places
If you leave campus and are working at home, or generally move places, remember that you’re also going to be changing WiFi networks! If you change networks you need to tell your device about it. If you’ve moved location and the device is stuck flashing green or rapidly blinking blue, you probably need to set new WiFi credentials
Particle devices remember the last WiFi network they were connected to, but if you change networks you have to tell it each time it should connect to a new or different network.
To do this, just put the device in listening mode (blinking deep blue) by holding down the MODE button for 3-5 seconds and follow the instructions in 1.4 or 3.2.