Neopixel Guide
Table of contents
- Library
- Communication and Control
- Wiring - General
- Power Considerations -
- Wiring - Neopixel Rings
- Getting to know the Library
- More information
Types of Neopixel Products. Credit: Adafruit
Neopixels are individually addressable LED pixels. Neopixels come in a variety of shapes and sizes
- Rings are in 12,16,24, and 60 pixel options
- Strips - variety of densities (typically 30 per meter and 6 per meter) in 1m + 5m lengths, can be extended or cut to desired length. Generally waterproofed too.
- Sticks (typically in an 8 pixel group)
- Individual pixels (Jewels - cluster of 6, Individual - single addressable) can be wired and chained into a group - work like reconfigurable strips.
- Matrixes - grids of neopixels typically in 4x8 and 8x8 arrangements.
A full breakdown of available products can be found here: https://www.adafruit.com/category/168
The good news is there’s one way to wire (only one pin required for communication), one library for all varieties and the code to interact with them is standard across all five types of neopixel.
Library
The best and easiest library to work with is the Particle Neopixel Library that can be found here: https://github.com/technobly/Particle-NeoPixel It’s a port of the Arduino neopixel library by Adafruit and has a few differences so refer to this documentation, not the Adafruit library! It works with all of Particle products including the Core, Photon, P1, Electron and RedBear Duo.
Include it in your project folder and add the following line at the top of your code:
#include "neopixel.h"
If you really want to get advanced, FastLED is an amazing library that lets you do a whole lot more but more involved. See: https://github.com/FastLED/FastLED/ and http://fastled.io
Communication and Control
All neopixels take just three inputs: power, ground and input. The way that you address and control the pixels (the input) is dependent on the type of chip that’s attached to LED. The bad news is that neopixels have been around for a long while and this means there’s lots of chips that have been used in the product. The good news is that the Neopixel library hides all of the challenge of talking with a chipset, but we do need to know what type of chip we’re taking with.
And there’s a few variations: WS2812, WS2812B, WS2812B2, WS2813, WS2811, TM1803, TM1829, SK6812RGBW, WS2812B_FAST,WS2812B2_FAST!
Yikes. So how do you know which one you’re working with?
At least for the Neopixel rings you’ll use as part of this course, 9/10 it’ll be WS2812 or WS2812B -
Here’s some other ways to find out:
- If you know the product you ordered you can look it up in the datasheet (scroll to Technical details).
- If it’s a ring that has 4 pins on the back, it’s most likely WS2812B
- If it’s a ring that has 6 pins on the back, it’s most likely WS2812/WS2813
- If it’s a RGBW product it’s probably SK6812RGBW
- If all else fails, or you don’t know you can try variations until the strip works!
Wiring - General
You need just one pin to communicate with your neopixels. That’s got to be a pin with PWM capabilities (Argon: D2-D8 and A0-A5, Photon2: D1, A2, A5, MOSI, MISO).
In the wiring diagram for this neopixel ring, it uses D2.
Wiring Diagram: Top - Using External 5v Power. Bottom: Using Photon2’s power
Power Considerations -
Neopixels are current hungry.
-
Less than 25 pixels and no other major components: You can probably get away with powering from
VUSB.VUSBon the Photon2 will supply around 500 mA of current. If you draw more current than that you could damage the microcontroller or it might brown out. -
If you plan to use more than 25 LEDS: You’ll need an external power supply to power the neopixels. If you use an external power supply, use the power rail to add it in and run a connection from
GNDon the Photon2 toGNDon the power supply. -
If you have other current hungry components (a solenoid, motors, etc.). It’s generally a good idea to use an external power supply out of the gate.
Wiring - Neopixel Rings
Initializing your Neopixel strip
You need to know:
- The chip you’re working with (see above) - it’s probably WS2812
- The number of pixels on your strip or neopixel device.
- The pin you’re using to communicate
Then you can set up your sketch. The first thing you’ll do is define this information and initialize the library with it.
// IMPORTANT: Set pixel COUNT, PIN and TYPE
#define PIXEL_PIN SPI
#define PIXEL_COUNT 7
#define PIXEL_TYPE WS2812B

Adafruit_NeoPixel strip = Adafruit_NeoPixel(PIXEL_COUNT, PIXEL_PIN, PIXEL_TYPE);
Pins compatible with the Neopixel
If you are using an older Particle board (the Argon, Boron, Xenon or original Photon), you can wire to most of the Digital Pins, e.g. D2, D3, etc. The Photon2 requires you to use the MOSI aka MO pin of the SPI or SPI1 interface with the neopixel
Getting to know the Library
The library includes a bunch of methods to help make controlling your Neopixel strip a breeze.
The first is the begin() method. This sets up your pins and tells the library you’re ready to start talking with the strip. You must include this in your project’s setup() for the neopixel to work right.
strip.begin();
Neopixels use the RGB (red, green, blue) color space to mix colors. Just like with an RGB LED you’ll mix the red, green and blue components to produce the color you want.
Color Mixing
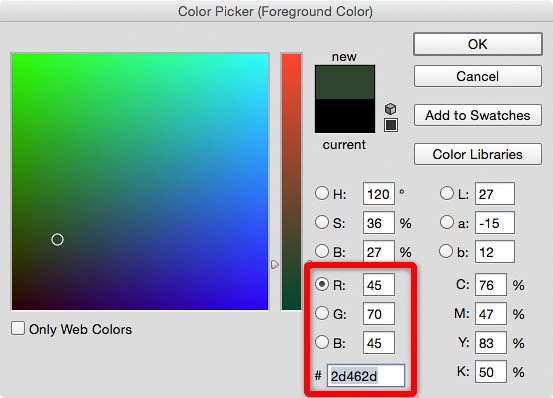
In Photoshop, when you choose a color you can see the Red, Green and Blue components for your selection, but you’ll also notice a HEX color - a 6 character reference to the color. This is essentially a integer that refers to the color with the first two digital reflecting the 255 possibility for red, the second two for green and third two for blue. With Neopixels it uses this number (or Hex Code) to set the colors on the individual pixels.
So that’s what we need to give it. But that’s not very human readable. Instead, the Neopixel gives us an easy method to convert R,G,B values into the Hex Number. It’s called strip.color().
uint32_t c = strip.Color(0, 0, 0) // Add a color
If you’re working with RGBW neopixels, you can give it 4 parameters to update the white component like so:
uint32_t c = strip.Color(0, 0, 0, 255) // Pure white
Once you’ve got a color you want to set, you can use setPixelColor to indicate the index (or position) of the pixel you want to change the color of and then give it the hex color you just created. For example:
strip.setPixelColor(i, c); // set a color
If you used the index of 0, it’ll change the first pixel. If index is 20 it’ll change the 20th pixel and so on and so forth. This gives you a lot of control. But if you wanted to simply set all of the pixels to the same color, you would then write a for loop and set each index using setPixelColor with the same color.
It’s important to know that setPixelColor doesn’t immediately change your pixel colors. It waits for a command to say you’re ready for all of the pixels to reflect your changes.
This lets you make changes to a lot of different pixels and apply them all at once.
To make your changes show you need to include one line:
strip.show(); // set updates to the strip
Finally, there’s a useful helper method that’ll let you quickly pull back the number of pixels in your strip. This is conveniently named
strip.numPixels() // find the number of pixels
It’s very useful for looping over lots of pixels to apply changes to them . For example:
uint32_t c = strip.Color(0, 0, 255) // Blue

for( int i = 0; i < strip.numPixels(); i++ ){
   strip.setPixelColor(i, c); // set a color
}
strip.show();
delay( 100 );
This will update all of the pixels to blue at once.
Note that this behaviour is very different to:
uint32_t c = strip.Color(0, 0, 255) // Blue

for( int i = 0; i < strip.numPixels(); i++ ){
   strip.setPixelColor(i, c); // set a color
   strip.show();
   delay( 100 );
}
This will update each pixel one by one, and wait 100 ms in between each update.